CLIPBOARD HISTORY IN WINDOWS 10?
Windows 10 takes a copy and paste to another level with a component called Clipboard history, which lets you see a rundown of things you have copied to the clipboard as of late. Simply press Windows+V.
At the point when you copy, cut or in any case move information from one spot on a PC, whether or not the information is text, a hyperlink, a picture or whatever else, a copy of the information is spared in an undetectable bit of the PC’s memory. Where the information you copy, cut or in any case move from one spot on a PC is put away is known as the PC’s Clipboard. Each and every bit of information you duplicate during one meeting of utilization on a PC is put away on its Clipboard, and the Clipboard resets each time the PC is closed down and afterwards booted back up once more. A PC’s Clipboard is the thing that empowers the client to uninhibitedly duplicate or move information starting with one spot then onto the next, venturing to permit information to be unreservedly moved between various applications.
On a Windows PC, when you press Ctrl + V the last bit of information you replicated or moved from somewhere else is duplicated over or moved to where you squeezed the Paste easy route.
Here are the means by which to turn it on and see your clipboard history.
WHAT GETS STORED IN CLIPBOARD HISTORY?
Clipboard history first showed up in windows 10’s October 2018 Update (Version 1809). As of now, Clipboard history supports text, HTML, and pictures under 4 MB in size. Bigger things won’t be put away in history.
Clipboard history stores a limit of 25 sections, with the most established things vanishing as new ones show up. Likewise, except if a thing is stuck to the Clipboard, the Clipboard history rundown will reset each time you restart your PC or gadget.
HOW TO ENABLE CLIPBOARD HISTORY IN WINDOWS 10?
In the first place, click the “Start” catch, and afterwards, click the “Rigging” symbol on the left half of the Start menu to open the “Windows Settings” menu. You can likewise press Windows+i to arrive.
Steps required to enable clipboard history in windows 10 is as follows:
- In Windows Settings, click on “Systems.”
- On the Settings sidebar, click on “Clipboard.” In Clipboard settings, find the area called.
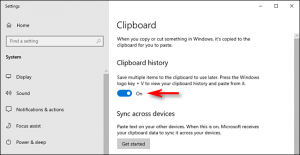
- “Clipboard history” and flip the change to “On.”
- Clipboard history is presently turned on. You would now be able to close Settings and utilize the element in any application.
HOW TO VIEW CLIPBOARD HISTORY IN WINDOWS 10?
To view clipboard history in windows 10, you have to follow some steps, the steps are as follows:
- When you have enabled Clipboard history, you can call up a rundown of things you have copied as of late while utilizing any application. To do as such, press Windows+V.
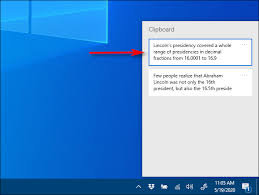
- A little window will spring up. The latest things you’ve copied are at the head of the list.
You can tap on anything in the Clipboard history list to paste it into an open application. - To expel things from Clipboard history, click on the circles (three specks) adjacent to the thing you’d prefer to erase. Select “Erase” from the little menu that pops up.
- On the off chance that you’d prefer to expel all the things from Clipboard history, click “Clear All” In the ovals menu.
- It’s additionally conceivable to nail a thing to the Clipboard history list. That way, it will remain on the list regardless of whether you reboot the PC or click a “Clear All.” To do as such, click on the three-spot menu and select “Pin.” You can unpin the thing later by choosing “Unpin” from the circle’s menu.
- The Clipboard history interface has a marginally extraordinary look to it on more seasoned adaptations of Windows. Here are guidelines for those running a form before 1909.
- In the wake of utilizing the Windows+V console alternate route, a little drifting window will spring up either close to the application you are utilizing, or if all windows are shut or limited, in the lower-right corner of your screen. The latest things you have replicated will be at the head of the rundown.
- While the Clipboard history window is open, you can tap on anything in the rundown to paste it into an open application or report.
- To expel things from Clipboard history, click the little “X” next to a thing on the rundown. Or on the other hand, you can clear the whole rundown by clicking “Clear All” in the upper-right corner of the Clipboard history window.
- You can likewise stick a thing to the Clipboard history list by tapping on the small pushpin symbol next to the thing. That way, the thing will stay on the Clipboard history list regardless of whether you reboot the PC or snap “Clear All.”
HOW TO DISABLE CLIPBOARD HISTORY IN WINDOWS 10?
To disable clipboard history in windows 10, you have to follow some steps. The steps are as follows:
- To kill Clipboard history in Windows 10, explore to Settings > System > Clipboard. Find the alternative named “Clipboard history” and flip the change to “Off.”

- When disabled, on the off chance that you press Windows+V, you will see a little window cautioning you that Windows 10 can’t show your clipboard history in light of the fact that the component is killed.
Any Queries or Doubts about the topic or still didn’t find a solution for your problem, please comment down your query and we will help you to solve the issue. Also please comment down, if you find any new way to resolve the issue.